2016-12-02

Pen testing Collaboration with FuseSoft Faction

If you have not checked out FuseSoft Faction and you're on a web and mobile/ application security penetration testing team then you might ought to give it a look. The project is currently in beta and free to download and try right now as long as your willing to provide feedback.

FuseSoft develops Assessment Collaboration, Vulnerability Management, and Assessment Automation software. The idea is to automate much of the overhead from penetration testing teams so they can get back to finding more bugs instead of writing reports, managing assessment scheduling, or keeping up with retesting, etc. They include collaboration and workflow enhancements into burp suite and in many cases you can enter all your findings right from burp and never have to log into the actual site. Default vulnerability information is repopulated for you by the tools so you don't have to rewrite or copy/paste descriptions and remediation recommendations for issues like XSS or SQLi or many others that you find assessment after assessment.

Below is the main Dashboard. Assessors have access to all of their current assessment and retest queues. There is even a "Your Week" box a the bottom that holds your current assessment scope and information. The idea is that all the information is pre-populated and ready for you to start hacking as soon as you log in on Monday morning. It even displays the other assessors who are working with you that week.


You can open an assessment to view the details and add vulnerabilities. There is a running total of all issues discovered at the top of the screen. Entering vulnerabilities common vulnerabilities will pre-populate the boiler plate text.


Below shows how the vulnerability entry works from the web site.


But your not restricted to just using the website to enter vulnerabilities. There is some pretty robust burp suite integration. You can add vulnerabilities and extracts of the vulnerable payloads just by selecting response text and right clicking. It has the option to upload the request and/or response as well as snip out cookie information. 

For example say we found XSS on a site. We have fully exploited it in burp repeater. Just right click, search for the XSS default vulnerability, and even add exploit steps all from inside Burp.


The message box supports the Markdown Syntax so you can do some light report editing right from inside burp. The result will look like the following screenshot on the web version.


Notice our exploit Steps have been converted to Rich Text, We have an example payload. We also have the full Request and only the selected response extracted. You can then perform further edits like highlight the specific exploit RED so that its easier to identify.

All of this goes from the WYSIWYG editor to DOCX reports. Below is an example extract of the MS Word Report.


The enhancements don't stop there either. The burp plugin will update in mealtime to display all new findings being discovered. During collaborative assessments you can see what other issues other users are finding and you can even replay their payloads. 

Below is an example of the vulnerability history for this application that is being tested. You see all issues from previous assessments and the new issues that your fellow assessors are finding. If you click any vulnerability in the table you will be presented with the full description and exploit steps. 

The Burp plugin detects if its a valid payload that can be  replayed and creates a link above the request. This allows the current assessor to replay with just a click. Notice below the hyper link above the request that displays 'Send to Repeater'.


You get this same functionality with retests as well. If a verification retest is assigned to you then you can pull of the previous assessment's payload and replay it. This saves you the time of trying to find previous Burp states and correct requests that were used to exploit the vulnerability originally taking a lot of the guess work out of retests. 


In addition to the ability to just replay existing vulnerabilities via burp, it can also allow you to send repeater items, site maps, proxy history, and scan items directly to another user. You can right click the item or items and then just select other online users and they will show up in their Burp session.

In the below screenshot we can take this exact repeater request and send to another user's repeater.


The Title you add will display as a new  Repeater tab title. This is useful for collaborating on finding an valid exploit payload. 

Report Generation and Peer Reviews:

I discussed briefly the report generation features above but there is more! You can upload your current reporting templates and Faction will output reports in those styles. There is a huge selection of variables that can be inserted into your original templates that will be replaced with assessment data. 

More information on that can be found here.


After reports are generated they can be added to the Peer Review Queue. This allows your peers to make changes to your reports before you finalize and send them out to the application owners. It allows your peers to strike out text or added notes to the side regions to alert you of issues. Its a typical change tracking functionality that you would find in Word but all web based. 


Vulnerability Management:

Vulnerability Management teams have a queue that shows all vulnerabilities assigned to them for remediation that are approaching due dates, gone past due, are out to assessors for retest, and retests that have gone past due. 


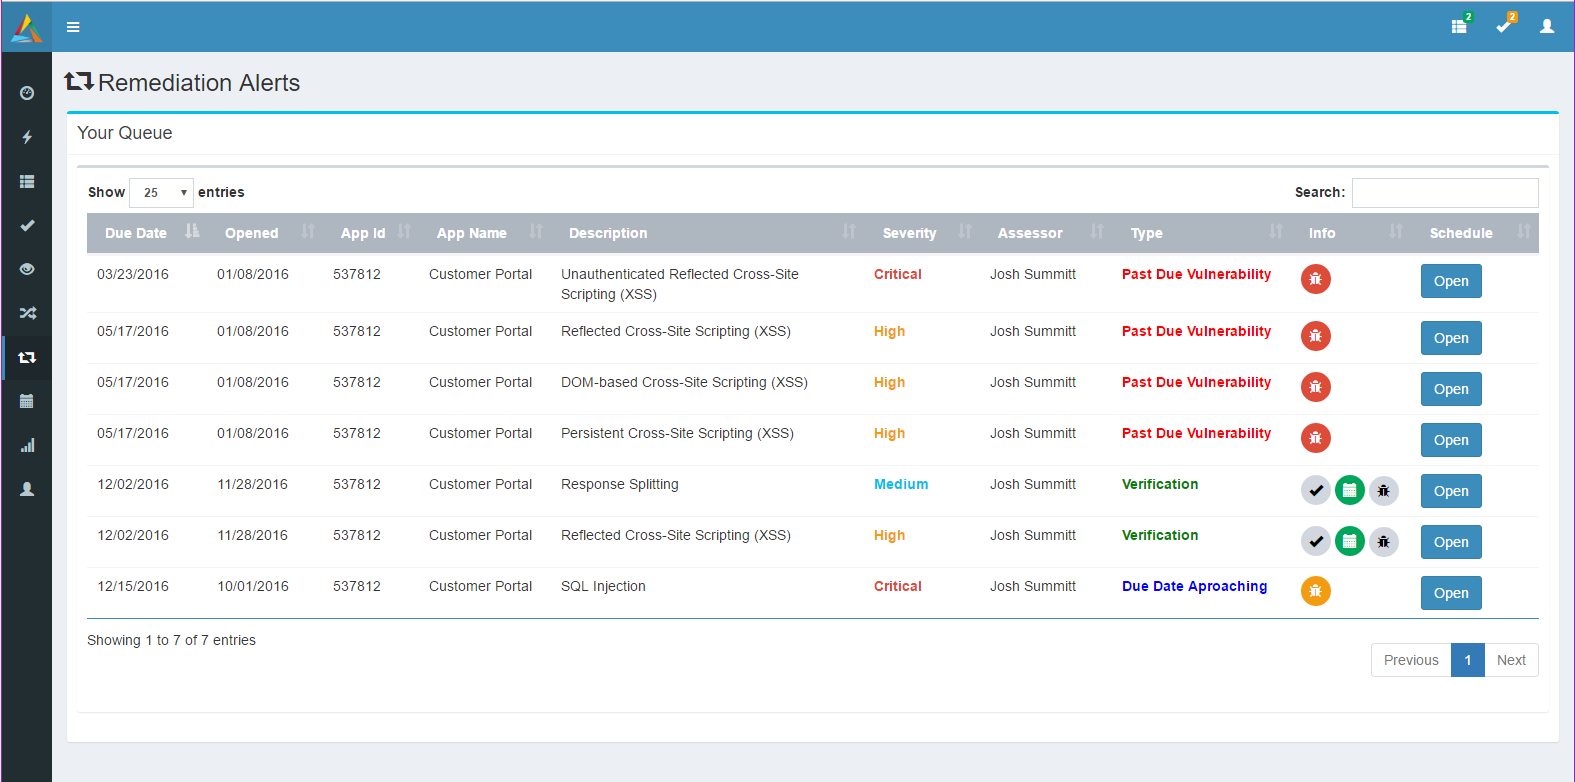
They can also search for vulnerabilities and add notes about them, close them in development and/or close them in production.

Assessment Scheduling:

Faction keeps track of all your assessors schedules and will alert you when an assessor is not available for the next big assessment. The system shows all assessors and annotates the user as [Not Free] to ensure you don't select them when they are off on other projects. You can still add them to an assessment even if they are not free though. 


There are forms to update the scope for the assessment and add files that might be required. This ensures that the assessor has all the information they need when they start the assessment.

But wait there is more:

Faction has a full REST API and a event based API that allows it to integrate with other systems. The even based API allows you to write python code to integrate with existing tracking systems or application inventory systems. 

The Rest based API will allow you to schedule assessments, query applications and vulnerabilities, and much more. The Faction Burp plugin was developed to use this API.


Conclusion

Check it our while its still free. Its a fully developed assessment workflow and collaboration engine that runs on a Tomcat Server with a Mongo backend. Really easy to install and use. 

Find out more at the FuseSoft Security Site.


2012-04-08

Mallory MiTM Proxy as a Wireless Access Point (Part 2 of 2)

In Part 1 we got an Virtual Machine partially running as a wireless access point using Virtual Box, Ubuntu, hostapd, and an Alfa wifi card. In this Post we will fully configure the AP and install/configure Mallory to MiTM anything that connects to the virtual Wireless Access Point.


Create An AccessPoint Startup Script

We have one more prerequisite before we can continue. We need to create a network bridge so the access point can connect to the NAT'ed ethernet adaptor. If its not already installed go ahead and install bridge-utils.

> sudo apt-get install bridge-utils


In your home folder create a file named startAP.sh and enter the following text.


   #!/bin/bash
   # stop the network manager
   stop network-manager
   #create the bridge and add eth0 
   brctl addbr br0
   brctl addif br0 eth0
   #Start the Access Point
   hostapd -B ./rtl_hostapd.conf > /var/log/hostapd.log
   # wait for AP to come online before adding it to the bridge   
   sleep 5
   #Add the wireless AP to the bridge
   brctl addif br0 wlan0
   dhclient br0


Run your script.


> chmod 755 ./startAP
> sudo ./startAP


*NOTE: ensure the birdge=br0 is somewhere in your hostapd config file. 


You should now have a fully configured Wireless access point. Try to get you mobile device or other computer to connect to the internet through this access point. In some instances you will have to manually add your IP address on the device. Usually setting something like the following will work: 


IP Address: 10.0.2.17 
SubnetMask: 255.255.255.0
Router: 10.0.2.2
DNS: 8.8.8.8


Mallory Installation Steps

In the virtual machine that was created in Part 1 you must drop to a terminal and first install mercurial before anything else.

> sudo apt-get install mercurial


Now determine a directory where you want to install and run Mallory. I like having it in my home Dir so thats where the rest of this tutorial will make reference to it.


> cd ~
> hg clone https://bitbucket.org/IntrepidusGroup/mallory
> cd mallory
> sudo ./mallory_install.sh


The first time you run the installation script it will ask you to verify you have an internet connection. Once you verify you just run the same script again and it will download and install all of the dependencies.


Lets MiTM some traffic!!!

Finally the fun happens! We need to start the Mallory core process and then the Mallory GUI while the AP is running.


> cd  ~/mallory/current/src
> sudo python ./mallory.py
Open another terminal and type:
> sudo python ./launchgui.py


Once the GUI comes up Select the Interfaces Tab and ensure that br0 is checked for  "Perform MiTM" and eth0 is checked for "Outbound Interface" and Click Apply.


Select the Protocols tab and uncomment the line starting with ssl_2 and Click Apply.


Click the Rules tab and ensure that Debug All is the current rule if not create it by copying the setting in the following ScreenShot.


Now Click on Streams and click "Intercept" and "AutoSend". After this you can navigate to some site on your phones browser and you should see the streams populating to the screen.


Additional Set Up

Strip Encoding


There are a few things your going to want to do here to really MiTM some traffic. First your going to want to create a rule that strips encoding on web pages since mallory does not automatically decode these like Burp Suite does. 
  1. Select the Rules tab.
  2. Set the Name to "Strip Encoding".
  3. Direction C2S (Client to Server)
  4. The Type is Muck
  5. Enter Accept-Encoding: gzip.*/Header: fake/1 into the Muck textbox.
  6. Passthu = yes
  7. Move "Strip Encoding" to the top.

Now Mallory will send "Header: fake" instead of "Accept-Encoding: gzip,deflate" on all HTTP requests which prevents the server from sending a compressed response (i.e. you can read the responses it in Mallory's Streams tab now).


Install the CA Cert on a mobile device

The next thing you will want to do is add Mallory's CA cert to your device. This is how you can intercept SSL traffic without the mobile device giving you SSL warnings or some apps will not connect at all if the certs are not signed by a trusted CA. 

The Mallory CA is located in ~/mallory/current/src/ca/ca.cer. If your intercepting traffic on IOS you can just email this cert to yourself, open the attachment with the IOS mail client, and select install. Now you can intercept SSL traffic with IOS apps that do certificate checks (and almost all do). On Android devices you need to install this certificate into /etc/security/cacerts.bks. You will need to jailbreak the device to do this and you will need the android SDK. There are already alot of articles on this so i'm not going to go into detail here. Maybe in another post.


Thats it. Good Luck! :)


2012-04-07

Mallory MiTM Proxy as a Wireless Access Point (Part 1 of 2)

Mallory MiTM Proxy is great tool if you need to intercept and modify non HTTP connections. I generally use this tool while doing mobile assessments to get an idea of all the connections the device is performing in the background. It allows you to intercept most types of tcp and udp connections and has special translators for HTTP protocols. I still prefer using BurpSuite for HTTP protocols but since Mallory understands protocols  that BurpSuite does not it reamins a great tool to have on your side.

There are a ton of ways to setup and configure Mallory. The easiest is as a VPN but I feel the wireless access point is more robust and easier to get your devices proxing through it once you have it set up.

Create a Virtual Machine Wireless Access Point

I created a new Ubuntu Virtual Machine to act as my MiTM Wireless Access Point with VirtualBox as the host. I like the virtual machine approach because I can save the state and start anew with each new assessment and I can run it on my laptop which makes my mobile environment more portable. This requires a wireless card that is USB, runs in Ubuntu, and can be put into Monitor mode. The Alfa cards work great for this, they are high power (mine is 2000mW), and fairly inexpensive.


Once your Ubuntu is installed and have a wireless card that works you need to install hostapd. It's the software that will make your VM act like an access point. You also need to create one NAT'ed Network adaptor in the VirtualBox config. I could not get this to work correctly unless it was NAT'ed. The Alfa drivers come with its own custom version of hostap. If you are using the Alfa then proceed to the next section. If not you should be able to get away with just running sudo apt-get install hostapd.

Installing the Alfa Drivers (Skip this section if not using the Alfa )

If your using the wireless card mentioned above then you also need to install the drivers from the Alfa website. The divers can be downloaded here. Once downloaded and unziped you will need to build the driver.
> cd [ALFA ROOT]/driver
Unzip and untar the driver and cd into the created directory structure and run the following commands.
>make
>sudo make install


Your driver should be installed and to test reboot the machine and see if the Alfa can connect to the internet. In virtual box i had to create a USB filter so that the VM can see the device. This is pretty simple and the Alpha shows up in the list when you click Add USB in the USB Virtual Box config.


Install HostAp for Alfa

The downloaded drivers have a custom hostap that needs to be built to use this card. You need to 
> cd [ALFA ROOT] /wpa_supplicant_hostapd/
> unzip wpa_supplicant_hostapd-0.8_rtw_20110524.zip
> cd wpa_supplicant_hostapd-0.8
> cd hostap
> make
> sudo make install
cd [ALFA ROOT] /wpa_supplicant_hostapd/
> cp rtl_hostapd.conf ~/
> cd ~


Configure HostAp

Now your ready to start your AP. You can configure your access point inside rtl_hostapd.conf or /etc/hostap/hostapd.conf if your not using the Alfa Drivers. In this file ensure that the interface is correct, change the ssid, and change the password. Below is an example of the only things I needed to configure.


interface=wlan0
ctrl_interface=/var/run/hostapd
ssid=MALLORY_VM
wpa_passphrase=thisisatest
channel=6
wpa=2
bridge=br0


Run your access point by typing:
> sudo hostapd ./rtl_hostapd.conf


You should be able to see your wireless access point show up on your mobile devices. In Part 2 we will discuss the installation of Mallory and getting it to MiTM any device that connects to the wireless AP.


2011-09-13

DB2 SQL Injection : Select the Nth row without cursors

Well I've looked all over the net for this solution and I could not find the answer so after much trial an error I was able to build my own solution. Lets say you need to query one row at a time from DB2 and you cannot use cursors and specifically you need to query sysibm.systables. I came up with this solution and there may be a more elegant way but this worked.

select * from (
        select * from systables order by name asc fetch first 1 rows only
) as G order by name desc fetch first 1 rows only

select * from (
        select * from systables order by name asc fetch first 2 rows only
) as G order by name desc fetch first 1 rows only

select * from (
        select * from systables order by name asc fetch first 3 rows only
) as G order by name desc fetch first 1 rows only

...

...

select * from (
        select * from systables order by name asc fetch first 1000 rows only
) as G order by name desc fetch first 1 rows only

I put the below query into a vulnerable parameter sent to a website and used burp intruder to iterate through each row by incrementing N.

select * from (
        select * from systables order by name asc fetch first N rows only
) as G order by name desc fetch first 1 rows only

The query works by first requesting N number of rows with the data ordered ascending and thus putting the Nth row on the bottom of the Result Set. Next query the Result Set ordered desc so that the Nth row is now at the top of the Result Set and fetch the first row. The Result Set will then return the Nth row you need without having to define cursors.

burp intrude1


2011-04-28

Hacking 101 with Tracer-T

This makes me laugh every time I watch it. I still cannot figure out if the kid is joking or serious.

2011-03-27

Roku hidden features.

I finally bought a Roku device today and immediately went looking for development resources. I was surprised to find they have and SDK you can download for free and you don’t need to pay anything to distribute your app as long as your distributing it for free. You can easily put your device into ‘Development Mode’ and this Development mode lets you upload code directly to the device though an HTTP interface and also enables a telnet port for which you can step through/debug the code. I think it’s great that you have the option to run the code locally on your own device or create a private channel so that only a select few can see it, or make it public (i.e. every one in the world). I’m still new into this but i can’t help but wonder what their app review process is like to ensure malware-like apps are not being distributed but i’ll get more into that at a later date.

All of this is cool and I can’t wait to make my own channel but the other really cool trick it can do is act as a network sniffer! It has the option to enable tcpdump that will cycle through up to 4 dump files. These are all available via its web interface. This could be fun just to leave running for a few days to see what turns up.

Be forewarned, there doesn’t seem to be any security around this stuff once its enabled though. No password is required to access any of these features once they are enabled but you must use the remote to enable them. Its like putting in the cheat codes to old Nintendo games. UP,UP,DN,DN, Left,Right,Left,Right, B,A….

The channel code is written in BrightScript which is completely new to me. It looks alot, well exactly, like VB Script. I have never been a big fan of languages that don’t end lines in semi-colons. Probably because I started learning programming in C. I was actually kinda expecting sometime more java like. That was more wishfully thinking on my part I guess.

Since its got tcpdump built into it lets see if i can port RADAR over to it. :P

2011-03-25

Hack Like in the Movies… with RADAR

I have just started a new (possibly open source) project/experiment to perform 3D modeling of network traffic and networking events in near realtime. My idea was to give the users the freedom of movement similar to a First Person Shooter (WASD controls) and the ability to better visualize how attacks interact with the network. Some things are just more apparent when you have a different view.

Introducing RADAR

RADAR is written in Java using openGL so that it should be easy to port to any system. It has a built in network sniffer and currently only nmap integration. It currently listens to network traffic and will animate information about all devices it finds on the network including open ports, whois, HTTP request/responses, etc. When complete it will have the ability to record, playback, pause, rewind, and slow down these events in the animation.
RADAR represents all IP devices as 3d orbs and places them in rings that somewhat represent subnets but basically anything that matches the first two octets goes into a ring group at this point (may be better later on). All orbs can be clicked to display detailed information about what’s communicating with the host. It displays a parsed out view of the pcap data by row and when a row is selected a view of the actual hexdump is visible. This can better be explained by the video below.


Download Coming Soon…

Soon as I feel comfortable with it I will release a version that any of you out there can try out.